
The cheapest way to organize a small pantry is to stop buying matching container sets and start thinking in zones. Empty everything out, group food by how you actually use it, then spend a modest amount (often under $30) on dollar-store bins, a couple of shelf risers, and maybe a door rack. That’s genuinely the whole formula. A tiny pantry, or even a single cabinet standing in for one, works fine when every item has a zone and you can see what you own.
The photogenic pantries online with fifty matching glass jars cost hundreds of dollars and a weekend of decanting. You don’t need any of that. Here’s the budget version that holds up in real life.
Step 1: Empty Everything and Face the Truth
Pull every single item out onto the counter or table. Yes, all of it, including the mystery cans at the back. This step always turns up surprises: three open bags of the same pasta, a tin from a recipe you made once, spices that expired before you moved in.
As you unload, make three piles:
- Keep. Stuff you eat, in date.
- Toss. Expired, stale, or that bag of flour with the suspicious clump.
- Donate. Unopened, in-date food you’re realistically never going to eat. Food banks take it gladly.
Wipe the empty shelves down while you’re in there. Crumbs in the corners attract pantry moths, and nobody wants that plot twist. Most people cut their pantry contents by a quarter just in this step, which is free storage space you didn’t know you had.
Step 2: Group Everything Into Zones
Before buying a single bin, sort the keep pile into groups based on how you cook, not how a store shelves things. Typical zones for a small pantry:
- Breakfast (cereal, oats, spreads)
- Cooking basics (oil, vinegar, flour, sugar, stock)
- Cans and jars
- Pasta, rice, and grains
- Snacks
- Baking extras and the rarely-used stuff
Now place zones by frequency. Eye-level and waist-level shelves get the daily zones. The top shelf gets the rarely-used baking gear and backstock. The floor, if your pantry has one, takes heavy items like bulk rice, drinks, and the bag of potatoes.
This is the same frequency logic that makes a cramped kitchen work, and it pairs well with the counter and cabinet strategies in our small apartment kitchen organization guide.
Step 3: Buy Cheap Bins, Not Pretty Ones
Here’s where the budget part matters. You need containers that corral each zone so things stop migrating, and the dollar store versions do this exactly as well as the boutique ones.
- Plastic baskets or bins, roughly shoebox size, one per zone. Get ones with a straight front edge so they sit flush and slide out like drawers.
- A couple of shelf risers (the little wire or plastic platforms) instantly double a tall shelf by adding a second level for cans and jars.
- One turntable or lazy Susan for the corner or the back, holding oils, sauces, and condiments. Spinning beats excavating.
- A few clear jars or containers for the bug-prone stuff. Flour, rice, and cereal keep better sealed. Reused large jars from pasta sauce or coffee work fine at zero cost, just wash and dry them completely first.
That’s the whole shopping list. Skip matching lids, bamboo anything, and label makers for now. Masking tape and a marker label bins just as clearly, and you’ll want to rearrange zones after a few weeks anyway.
Step 4: Claim the Door and the Walls
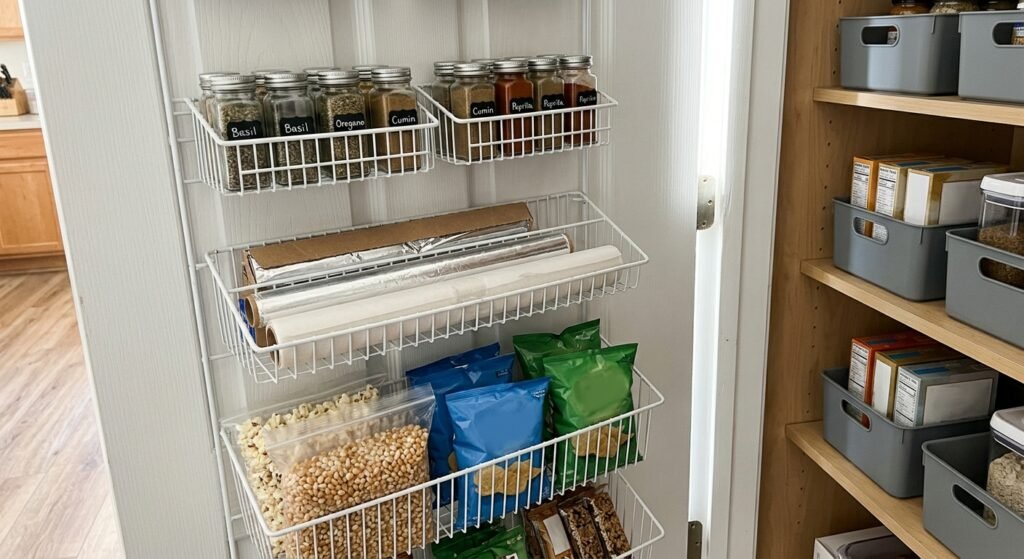
In a small pantry, the inside of the door is a free bonus shelf you’re probably ignoring.
- An over-door rack with wire baskets holds spices, packets, foil, and sandwich bags. The over-door style needs no screws and comes off when you move, which matters in a rental.
- Adhesive hooks inside the door hang measuring cups, scissors, or the apron.
- A shoe organizer’s clear pockets work here too, holding seasoning packets, snack bars, and tea. It’s the same trick that earns its keep on bathroom doors in our small bathroom storage ideas roundup.
If your “pantry” is actually one cabinet, the door trick matters even more, because it can hold your entire spice and packet collection and free a whole shelf.
Step 5: Solve the Deep-Shelf Problem
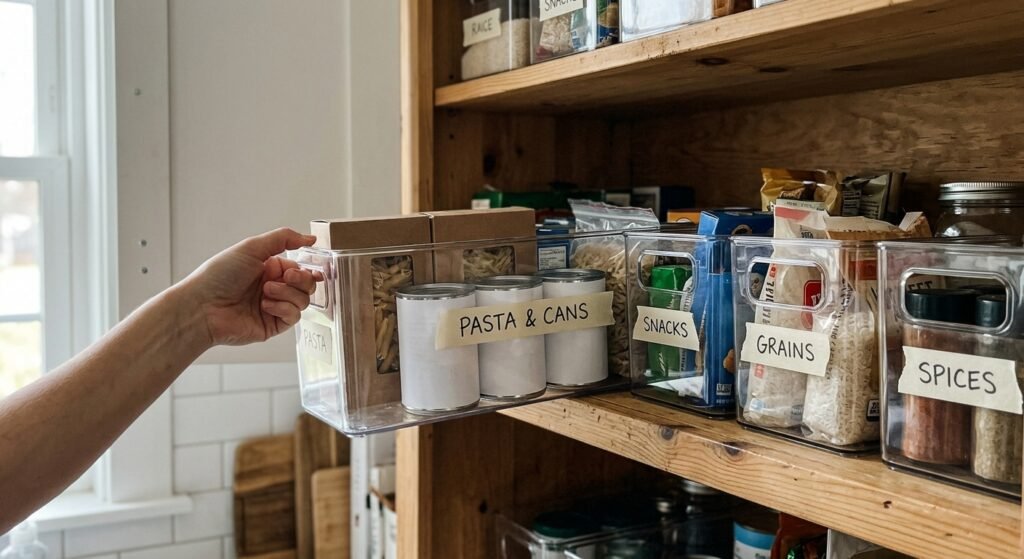
Deep shelves are where food goes to be forgotten. Two fixes:
- Bins as drawers. A long bin that slides out brings the back of the shelf to you. Pull, grab, push back. This alone ends the archaeology.
- First in, first out. When groceries come home, new cans and packets go to the back of their bin, older ones come forward. It’s a thirty-second habit that quietly eliminates expired food.
For canned goods specifically, a stepped can riser (or a DIY version made from a couple of small boxes) lets you see three rows at once instead of one wall of labels.
Step 6: Label Lightly and Leave Room
Label the bins, not the individual items. “Breakfast,” “Cans,” “Pasta + rice” is plenty. When labels are that broad, putting things away takes zero thought, so the system actually survives contact with a busy week.
And leave a little empty space, ideally one spare bin or a bit of shelf. A pantry packed to 100 percent capacity breaks the first time you do a big shop. That spare room is what absorbs the chaos.
Keeping It Organized (The Five-Minute Version)
- Before you write a grocery list, glance through the bins. Shopping your own pantry first saves real money and stops the duplicate pasta situation.
- Once a season, do a quick date-check of one zone. Ten minutes, done with a cup of tea.
- If a zone keeps overflowing, that’s data. Give it a bigger bin or split it in two rather than fighting it.
If sorting the pantry has you eyeing the rest of the apartment, the same zones-and-cheap-bins approach scales to closets too, and we broke that down with a full shopping list in how to organize a small closet on a budget.
FAQs
How do I organize a small pantry if I only have one cabinet?
Same system, compressed. Give each shelf a job (daily food at eye level, heavy and bulk items at the bottom), use one bin per category so items don’t mingle, add a shelf riser for cans, and move your entire spice and packet collection to an over-door or wall-hung rack. One cabinet plus a door can genuinely feed a household.
Do I really need to decant everything into clear containers?
No, and for most items it’s wasted effort. Decant the bug-prone basics (flour, rice, cereal, sugar) into sealed containers, and leave everything else in its packaging inside a labeled bin. Full decanting looks great in photos but adds a chore to every grocery trip.
What’s a realistic budget for organizing a small pantry?
Around $20 to $40 covers it: six to eight dollar-store bins, two shelf risers, a turntable, and an over-door rack. Reuse jars you already have for dry goods. If you can only buy one thing, buy the bins, since grouping does most of the work.
How do I keep pantry moths away?
Seal the tempting stuff (flour, grains, cereal) in airtight containers, wipe shelves down every few months, and check bags of flour and rice when you buy them, since infestations usually arrive from the store. A bay leaf in the flour container is the old trick, and while evidence is mixed, it costs nothing.
Where do I put root vegetables like potatoes and onions?
Low, dark, and ventilated: a basket on the pantry floor is ideal. Keep potatoes and onions in separate baskets because stored together they spoil each other faster. And keep both away from the flour zone, since the moisture they release isn’t a friend to dry goods.