
The fastest way to fix loose cabinet hinge screw holes is to pack the stripped hole with wood, glue it, and drive the screw back into the fresh material. That’s really all three methods in this guide boil down to: toothpicks and wood glue for a quick fix, a glued hardwood dowel for a permanent one, or a two-part wood filler when the hole is chewed up beyond saving. All three cost under five dollars, and none of them need special tools.
A cabinet door that sags, swings crooked, or clunks when it closes almost always has this exact problem. The screw isn’t broken and the hinge isn’t bent. The wood around the screw has just worn away, so the threads have nothing left to bite into. Tightening the screw harder makes it worse, because you’re grinding the hole even wider. Stop tightening and fix the hole instead.
Why Hinge Screws Pull Loose in the First Place
Most cabinet boxes aren’t solid wood. They’re particleboard or MDF with a thin veneer, and those materials crumble under repeated stress. Every time a door gets yanked open, slammed shut, or leaned on by a kid, the screw wiggles a tiny bit. Over a few years those wiggles turn the screw hole into a cone.
Solid wood doors do it too, just slower. Kitchen cabinets get the worst of it because they’re opened dozens of times a day, and the doors near the stove also collect a film of cooking grease that works its way into the hinges. If your doors are sticky as well as saggy, it’s worth cleaning them properly before you rehang anything. There’s a full guide on that here: How to Get Cooking Grease Off Painted Cabinets.
What You’ll Need
- Wood glue (regular yellow carpenter’s glue is fine)
- Round wooden toothpicks or bamboo skewers
- A hardwood dowel, 1/4 inch or 5/16 inch, for Method 2
- Two-part wood filler or epoxy putty, for Method 3
- A screwdriver (hand-driven, not a drill, for the final tightening)
- A utility knife or flush-cut snips
- Painter’s tape and a pencil
You don’t need all of it. Pick your method first, then grab what that one needs.
Method 1: The Toothpick Fix (Fastest)
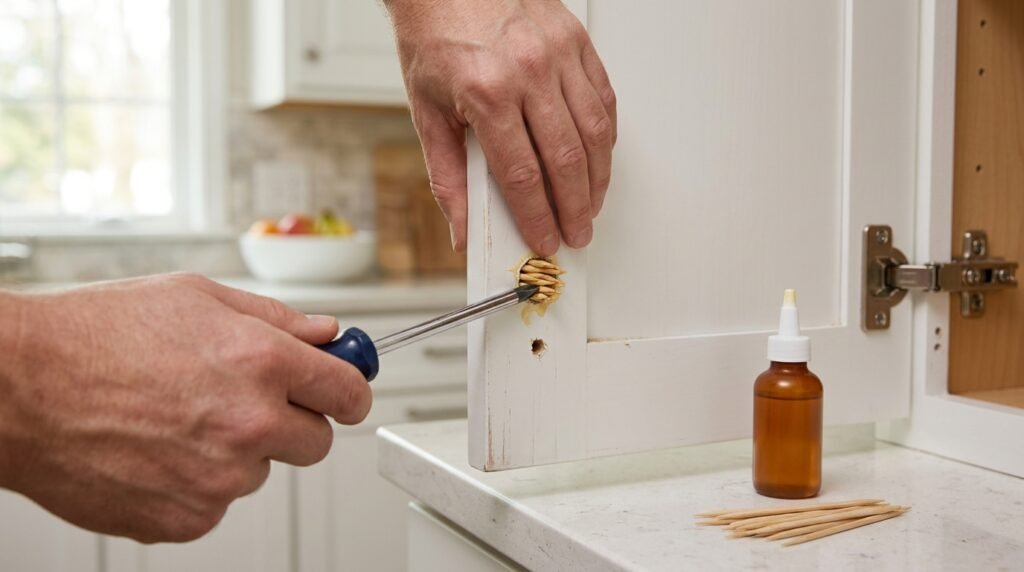
This is the classic, and it works better than it has any right to.
- Take the door off or support it. If only one screw is loose, you can leave the door hanging and just remove that screw. If two or more are loose, unscrew the hinge from the cabinet side and set the door down somewhere soft.
- Fill the hole with glued toothpicks. Dip two or three round toothpicks in wood glue and push them into the hole as far as they’ll go. Keep adding until the hole is snug and you can’t fit another one. In crumbly particleboard that might be five or six.
- Snap or cut them flush. Toothpicks usually snap off cleanly if you bend them at the surface. If they splinter, trim them flat with a utility knife so the hinge can sit flush against the wood.
- Wait for the glue. This is the step everyone skips, and it’s why the fix fails. Give the glue at least an hour, ideally overnight. Driving a screw into wet glue just churns everything into mush.
- Reinstall the screw by hand. Line the hinge up, start the screw gently, and tighten until it’s snug. Stop there. Cranking it down hard is what stripped the hole the first time.
Bamboo skewers work the same way and are a bit denser than toothpicks, which helps in soft particleboard. Golf tees are another old trick for bigger holes, though you’ll need to trim them flush with a knife.
Method 2: The Dowel Fix (Strongest)
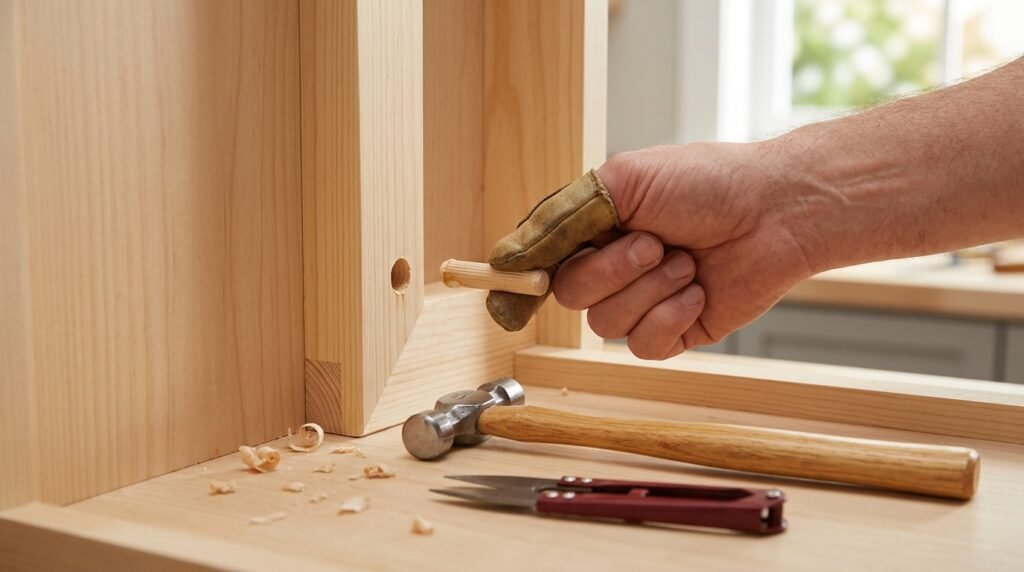
If the toothpick repair has already failed once, or the hole is properly wallowed out, a glued dowel gives the screw brand-new solid wood to grip.
- Drill the hole out clean. Use a drill bit the same size as your dowel, usually 1/4 inch, and drill the damaged hole out to a uniform round shape about half an inch deep. Wrap painter’s tape around the bit as a depth marker so you don’t punch through the cabinet side. On a 5/8 inch panel there’s less margin than you’d think.
- Glue in a dowel plug. Cut a short piece of dowel, coat it in wood glue, and tap it into the hole. It should be a snug fit, not a hammer-fight.
- Trim it flush and let it cure. Cut the dowel level with the surface and leave it overnight.
- Drill a small pilot hole. Mark the screw position through the hinge, then drill a pilot hole slightly thinner than the screw. Skipping the pilot hole in a hardwood dowel can split the plug.
- Drive the screw snug by hand.
This repair is genuinely permanent. The screw is now biting into fresh hardwood instead of tired particleboard, which is stronger than the cabinet was on day one.
Method 3: Wood Filler or Epoxy (For Crumbled Holes)
When the material around the hole has crumbled away entirely, which happens a lot with particleboard near sinks and dishwashers where moisture got in, there’s nothing left to drill into. Two-part wood filler or epoxy putty rebuilds the area.
- Dig out any soft, crumbly material with a screwdriver tip until you reach solid wood or board.
- Mix the filler per the instructions and press it firmly into the cavity, slightly overfilling.
- Let it cure fully. Two-part fillers usually harden in 15 to 30 minutes, but check the label before drilling.
- Drill a pilot hole and drive the screw in by hand.
One note from experience: skip the cheap single-tube “wood filler” for this job. It’s designed for cosmetic dents and it crumbles under a screw. You want the two-part kind that cures rock hard, or an epoxy stick you knead together.
Common Mistakes That Ruin the Repair
- Using a drill driver for the final screw. Cordless drills over-torque small screws in a heartbeat. Hand tools give you feel.
- Not waiting for the glue to cure. An hour minimum. Overnight is better.
- Reusing a mangled screw. If the head is chewed up or the threads look worn, replace it. Take it to the hardware store and match the length and gauge.
- Ignoring the hinge itself. Sometimes the hinge cup is cracked or the adjustment screws have drifted. European-style hinges have two or three adjustment screws, and five minutes with those can fix a crooked door without any hole repair at all.
- Fixing one hole while three others are halfway gone. While the door’s off, snug up every screw on every hinge. Loose neighbors overload the one you just fixed.
While you’ve got the doors open and the screwdriver out, it’s also a good moment to deal with drawers that creep open on their own, which is usually an even quicker fix. That guide is coming up next in this series.
FAQs
Can I just use a bigger screw instead?
Sometimes, and it’s tempting because it takes thirty seconds. Go up one gauge, keep the same length, and it can work in solid wood. In particleboard it usually just strips a bigger hole a few months later. And a longer screw risks poking through the other side of the panel, so measure before you drive it.
Does the toothpick trick really hold long-term?
In solid wood, yes, often for years. In particleboard it’s more of a medium-term fix. If a toothpick repair fails a second time, stop repeating it and do the dowel method instead. Each redo removes a little more material.
What about those plastic wall anchors?
A small plastic anchor pushed into the stripped hole does work in a pinch, and plenty of handymen use them. The glued dowel is stronger and looks cleaner if you ever remove the hinge, but if you’ve got an anchor in the junk drawer and guests arriving in an hour, use the anchor.
My cabinet is MDF and it keeps stripping. Any hope?
MDF is the worst material for screw holding, honestly. Use the dowel method with a proper pilot hole, drive screws by hand only, and consider adding a second hinge to share the load on heavy doors. Once MDF is badly crumbled, epoxy putty is the only repair that lasts.
The door still sags after fixing the screws. Why?
Check the hinge adjustments. Most modern concealed hinges have a screw that shifts the door up and down and another for side to side. If the door was hanging crooked for months, it probably needs realigning even after the screws are solid. Turn the adjusters a half-turn at a time and close the door to check.
Pingback: How to Organize Small Closet Space on a Budget (Under $50) - The Home Perk
Pingback: Under-Sink Organization for a Small Bathroom (Renter-Friendly) - The Home Perk
Pingback: Weekend Fixes Under $25: Easy Home Repairs for Renters - The Home Perk